One App, Three Ways: WeatherWear
In a previous post, I worked on developing a to-do list app in three different platforms; Apple, Android, and Web. I did this to understand the pros and cons of writing natively for each. Across each platform I used their respective native declarative frameworks. For Apple, I used SwiftUI. For Android, I used Jetpack Compose with Kotlin. For Web, I used SvelteKit with TailwindCSS. Now, I want to product an app for three different platforms with minimal effort. This time I am including Continuous Integration (CI) and User Interface testing as part of the process to determine the effort associated with maintinaing three native applications in a CI environment. I also wanted to do something that included calls to a remote API and permissions, which is common in most mobile apps.
How much effort does it take to produce an app for three different platforms natively vs. using something like react native. Today there are many blog posts that state that developing for multiple platforms does not scale because of things like logistics, maintenance, costs.
TL;DR
With the use of consolidated dev ops tools, similar declarative language structures and design patterns, and shared design assets, one person can product an app natively without significant overhead for each platform. Once you have everything set up, it's not that painful to maintain three separate apps. Setting them up is the painful part. There should be more tutorials on how to do this.

1: Leverage dev ops tools that allow for build and test in parallel
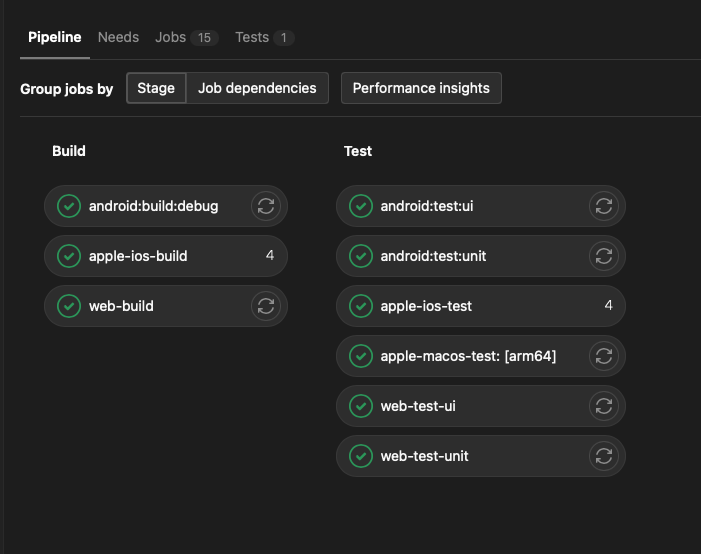
A common refrain of the developer community is that producing apps natively requires different code bases and dev ops tools. This is true, to a point. The IDEs may be different, which has it's benefits, but the command line is the lowest common denominator. Analyizing, Building, and Testing your code can all be done programmatically. Some use github actions, circle ci, or jenkins. I have chosen Gitlab. Gitlab allows for a broad set of continuous integration configurations to be used. This provides quite a bit of flexibility and consolidation of effort.
IDE
- Apple: Xcode... Does not take a significant amount of time to download and create a project. Coding and testing within a few minutes.
- Android: Android Studio... Takes some time to get the work rolling. A lot of additional libraries needed to get Location Services, HTTP calls, and testing set up. This required some trial-and-error.
- Web: Visual Studio Code... Visual Studio is the editor of choice for web work. That is completely disconnected from the work to set up the project. Most of the project setup was done at the command line. There was also some effort in setting up the Visual Studio to recognize Svelte files.
Use of the native IDE is beneficial
- IDE is used for coding... Given that I am testing from the command line, The IDEs were used for coding.
- Each platform has hot-reloading at this point. That was a benefit for React Native, but not a winner anymore. SwiftUI and SvelteKit have had hot reloading for some time. Now, with Compose, Android also has hot reloading. This allows me to see UI changes as I code them.
- Simpler process for integrating 3rd party libraries. Apple has a lot of batteries included capability. The only 3rd party library I integrated on the Apple platform was Apple's own argument parser to assist with automated testing. Android required some additional libraries to support both the operation of the app (http calls, permissions, location services) and for testing. Adding them was straight forward. Determining which to add, was not. SvelteKit+TailwindCSS proved to be the most difficult in determining which libraries to add.
Automated Testing
- Apple's automated Unit and UI testing proved to be simple. This may be drive by my use of SwiftUI since it's introduction. I've written other articles about some ways I've built up test infrastructure.
- Android's automated Unit testing proved to be simple also. Similar to Apple's declarative UI, being able to test UI components individually or as a full workflow was straight forward.
- SvelteKit and TailwindCSS leverages a set of third party libraries named Jest and Playwrite. Getting this up and running took quite a bit of time.
Continuous Integration
- Gitlab... Gitlab provides source version control as well as continuous integration.
- Gitlab Runner... Gitlab Runners provides a structured, distrubuted way of executing continuous integration.
SaaS Hosted... Web CI: Gitlab offers quite a few host runners that are part of the tiered package that is available with their SaaS offering. This is used for Web CI.
Self-hosted... Apple CI: Gitlab offers the ability to place runners on just about all platforms. For Apple CI, I have chosen to run on my person computer. Gitlab is working on a SaaS solution for running the Apple platform in CI, but that is limited general availability at the time of this writing.
Digital Ocean-hosted... Android CI. The Android emulator requires KVM. That is currently not available through gitlab hosted runners. For this, I set up a runner on a Digital Ocean droplet that I setup using a set of terraform and ansible scripts. This also included creating a custom docker image with the Android command line tools.
Setting up each of the CI pipelines took time with some trial-and-error to get correct. The least amount of effort was on the Apple side, testing for iOS (iPhone and iPad) and macOS. The most effort was around getting Android UI testing complete. I went back and forth between native testing and other frameworks. In the end, I went fully native. Configuring the infrastructure properly is what was the most painful. This can be reduced with better tutorials, best practices, and templates.
2: Sharing of design and data assets
Image Assets
- Main image (created in Figma) that we can export for transforming across the platforms. Creating the densest asset as a starting point and scaling down for each platform made the most sense here.
- This was something that I did take the time to read through the Design Guideline docs of each platform to determine proper file formats. I ended up writing a python script to assist with automating that process. With templating of the output asset, this makes life much easier as I need to CRUD any other assets.
Data Assets
- Secrets: This project uses git-secret to manage credentials and uses shell scripting to move the credentials over to the appropriate folder during building and testing. Git secret is low effort to pick up and use. The primary secret that is in this application is the weather API key. No one ever wants their API keys floating around.
- Mock Data: The project also uses mock data for testing. This way we always use the same data across each platform for testing, simply copying the data from the main. I use a yaml file that I convert to GPX data.
3: Similar stronly typed, declaritive language structures and design patterns
Strongly typed languages
Declarative User Interface Development
Common Design Patterns
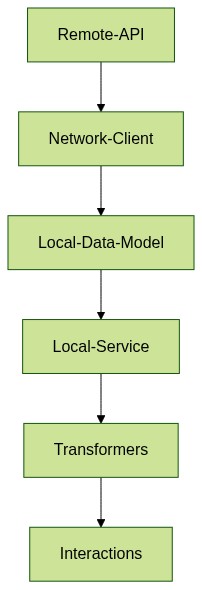
I took the approach of attempted a common app structure across all three platforms. Given that each of the languages and constructs were fairly similar, looking for correlaries in concepts was simple. This reduced the level of context switching I had to do between each of the platforms.
Differences about the various layers between the languages
Remote API: All three apps used the remote Open Weather API
Local Network Client: Apple has a built in network client for Swift. Android required me to decide between multiple clients. I settled on Ktor as it most closely resembled the network client in Swift. For SvelteKit, I used axios
Local Data Model: The remote API returns JSON. Swift has built in functionality to convert the remote API data model to a Swift struct with Decodable. Koltin also has conversion functionality through Kotlin Serialization apis, but they had to be added to the project. JSON objects are native to web, but I wanted to ensure we had a clear type defined. This type is similar to the Swift struct and the Kotlin data class.
Local Service: The local service, for me, operates as a Back-End-For-Front-End in that it encapsulates network calls, abstracting away the API, and providing concreate data for the application. I could change from an API call to a database call, but as far as the application is concerned, it's pulling a concreate WeatherData model.
Transformers: I look at transformers as very simple operators that take the local data model and convert them to the necessary representation for the interaction layer. In the weather application. The transformer takes the raw weather data and rounds the numberical value for something more human readable.
Interaction (Workflow) layer: This includes controls, visuals, text that the user interacts with. The intent was to break this into components that are independent from the data and services components. The only interactions for this app are the labels that present the current location, timezone, and temperature.
4: React-native issues
- 500KB yarn lock file? WTF
- Uses CocoaPods... can be brittle for managing configurations and adding libraries
Follow ups
I plan on writing some articles associated all of the ancillary work I had to do in order to get this project in the "all green" state that it's in. More to come.
Find me on Twitter and tell me all about it!
